


“Hey, Ieva–how do I write & design a course checkout page that actually gets my people to click the “Buy Now” button?”
Great question.
Many digital product creators overlook the importance of a well-designed checkout page, focusing more on “flashier” assets like their sales page or Instagram content.
I’m glad you’re not one of them! 😉
If done right, a conversion-optimized checkout page can help you ease any last minute doubts your customer might by having (“Maybe I should buy that new espresso machine instead?”) and set the tone for your entire digital relationship.
It’s the last conversation you’ll have with a potential buyer before they commit to your product–or go back to aimlessly scrolling TikTok. So let’s make it a good one, yeah?
What Is a Checkout Page, Anyway?
A checkout page is that wonderful place where your soon-to-be customer enters their payment information and (hopefully) completes the purchase.
(Groundbreaking stuff, I know.)
That said, let’s take a moment to zoom out and look at it in the context of your entire sales funnel.
🔑 In this context, a checkout page is the final door someone has to walk through before they transition from being a curious onlooker to a paid customer.
At this point, this person has already read your sales page, seen some of your launch emails, and scrolled through your Instagram looking for free tips.
They know who you are and they are *pretty sure* they want what you’re selling.
So the true purpose of your checkout page?
- Alleviating any last-minute worries they may have, and
- Making the payment process as smooth and easy as possible
That’s it.
Keep these two goals in mind when writing and designing your course checkout page, and you will be in better shape than most beginner creators out there.
The Two Types of Course Checkout Pages
There are two main types of checkout pages: one-step and multi-step.
➡️ In a one-step checkout situation, everything happens on a single page.
Your customer fills out their name, email, and payment information all in one go, then hits the “Purchase” button to complete the process.
With a multi-step checkout, the process gets broken down into separate steps.
Your customer may enter their name and email address on the first page, then click through to move on to the payment details page next.
This means that in some cases, you may be able to capture the potential buyer’s email address even if they don’t complete the purchase (giving you a chance to work some abandoned cart sequence magic later).
Which Type Should You Choose?
As a copywriter-slash-funnel strategist, I usually see better conversion rates with single-page checkouts.
Since everything is right there on one page, they are much easier to optimize, leading to higher conversion rates over time.
(As a customer, I also find them less overwhelming and confusing than multi-step checkouts–and so do most of my clients. Make of that what you will.)
🤔 A multi-page checkout process definitely feels a bit clunky in comparison.
That said, if you’ve got a strong abandoned cart sequence you’re itching to try, it’s worth experimenting with.
Sometimes a well-timed reminder (“hey, do you still want this?”) can be the best thing for you AND your customer.
Bottom line: if abandoned cart email sequences are not on your radar yet, go with a single-page checkout, and follow the tips below to make yours the best it can be.
How to Design a Course Checkout Page That *Actually* Converts
Element #1: Your course or digital product name
Okay, yeah, this seems painfully obvious–but is it? 🤦🏻♀️
I’ve been in the online business space for more than seven years now, and I’ve seen far too many checkout pages that are nothing but a generic order form with a dollar amount at the bottom.
People get distracted.
So remind them what they’re buying.
Starting with the name of your course or digital product.
Element #2: Tagline or a (short!) description
You don’t need to include your entire sales pitch on your checkout page (that’s what your sales page is for).
A short description–or your course tagline, if you have one–will do just fine.
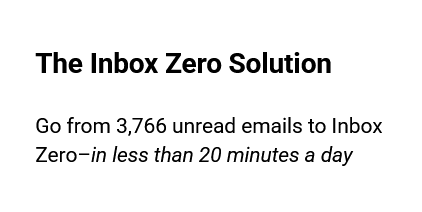
💡 When in doubt, summarize your main promise in 1-2 sentences using this formula:
Go from <Point A> to <Point B> in just <TIME LIMIT>–without <UNDESIRABLE THING>.
Here’s an example:
Element #3: An eye-catching visual
You know that cool mock-up image you (hopefully) created for your sales page?
(The one with the little laptop/iPad/other course materials?)
Let’s add one to your checkout page, too.
Now, it doesn’t have to be as elaborate as the one on your sales page (you probably won’t have space for that).
But a little visual can go a long way when it comes to reminding your audience that, yes, the thing they are buying is real.
📷 Alternatively, you can also use Canva to design a simple graphic with your course name, tagline + a photo of yourself.
Seeing your beautiful face right there on the checkout page can help soothe some of those same anxieties (“okay, yeah, so this course is taught by a real person”).
Element #4: A snapshot of what’s included
Remind your soon-to-be-student exactly what they’re getting in 5-7 snappy bullet points.
Focus on the big picture stuff, like the core modules, group calls, and community access.
✍🏻 If you have the space, consider adding a little extra info to punch up each bullet point.
For example, instead of saying:
✔️ 6 months inside The Draft-To-Done Community
Add a little extra info about what’s included, like this:
✅ 6 months inside The Draft-To-Done Community, including weekly hotseat calls and daily support inside our FB group (valued at $1000)
Or remind them why that particular feature is something they want:
✅ 6 months inside The Draft-To-Done Community, where we’ll make 100% sure you get a first draft to your editor at least 24 hours before the deadline
^^ No space for that much copy? No problem.
Regular bullet points will do just fine as well.
Element #5: Social proof
You know how we talked about alleviating any last-minute doubts on your checkout page?
Social proof can definitely help with that.
Shoot for 3-5 pieces of social proof on this page (but try to add at least one, even if it’s not “perfect”).
✅ Try to prioritize feedback that highlights tangible results (“83% increase in leads” or “No more crying at H&M”) rather than personality-based feedback (“Ashley is such a great teacher!”) for this particular page.
A few different types of social proof you can play around with:
Regular testimonials
Use a short, powerful snippet as your testimonial title, placing the rest of the testimonial underneath it, like this:
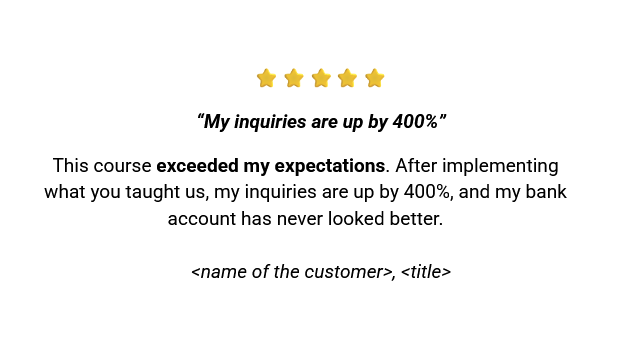
Bonus points if you can include a (tiny) photo of the person who said it.
Screenshot testimonials
You can use testimonial screenshots from your DMs, Slack messages, or Instagram comments on your checkout page–as long as you ask the person for permission first.

These types of testimonials have the advantage of feeling a bit less staged than regular testimonials.
“Featured in” section
You know the “featured in” section you often see on people’s websites?
The ones with a ton of logos of companies they’ve worked with?
While I wouldn’t put it front and center on your checkout page, it could be interesting element to add at the bottom of the page (after the payment form) if you have the space.
Element #6: Money-back guarantee
Your digital product may not have a money-back guarantee–but if it does, it deserves a spot on your checkout page.
A reminder of your money back policy can offer some much-needed reassurance (“hey, you can still change your mind!”) and help put your potential buyer at ease.
Element #7: What happens next
Okay, we are going above and beyond here…
But adding a sentence or two about what happens after they click the “Buy” button can go a long way in easing people’s anxiety.
This is especially important if your audience is comprised of people who are not necessarily familiar with the digital product space.
🥰 Ease their worries by leaving them a little “what happens next” reminder like this:
Once you complete your purchase, you’ll receive an email with your course login details and instructions to access the content within 5-10 minutes.
BONUS ELEMENT: An order bump
An order bump is a small, additional offer you can present right on the checkout page, related to the main course or product they are purchasing.
For example, if you are selling a course on email marketing, your order bump could be a bundle of customizable launch email templates.
This offer should feel like an absolute no-brainer to add on.
A mismatched order bump can actually mess up the conversion power of the rest of your page.
🙅🏻♀️ So you are not sure you’ve got the right product for it, it’s best to leave it off for the time being.
Do I Need To Include All Of These Elements?
Not at all.
I would say that the first five elements (name, tagline, visual, a bullet point list of what’s included + some form of social proof) are the most important.
These are the core elements of good checkout page design that will help alleviate any last-minute worries and move your people closer to the “Buy” button.
Everything after that is optimization (and can be handled after you’ve re-launched your course a couple of times).
So if you’re feeling overwhelmed?
⬇️ Start at the top of the list and work your way down.
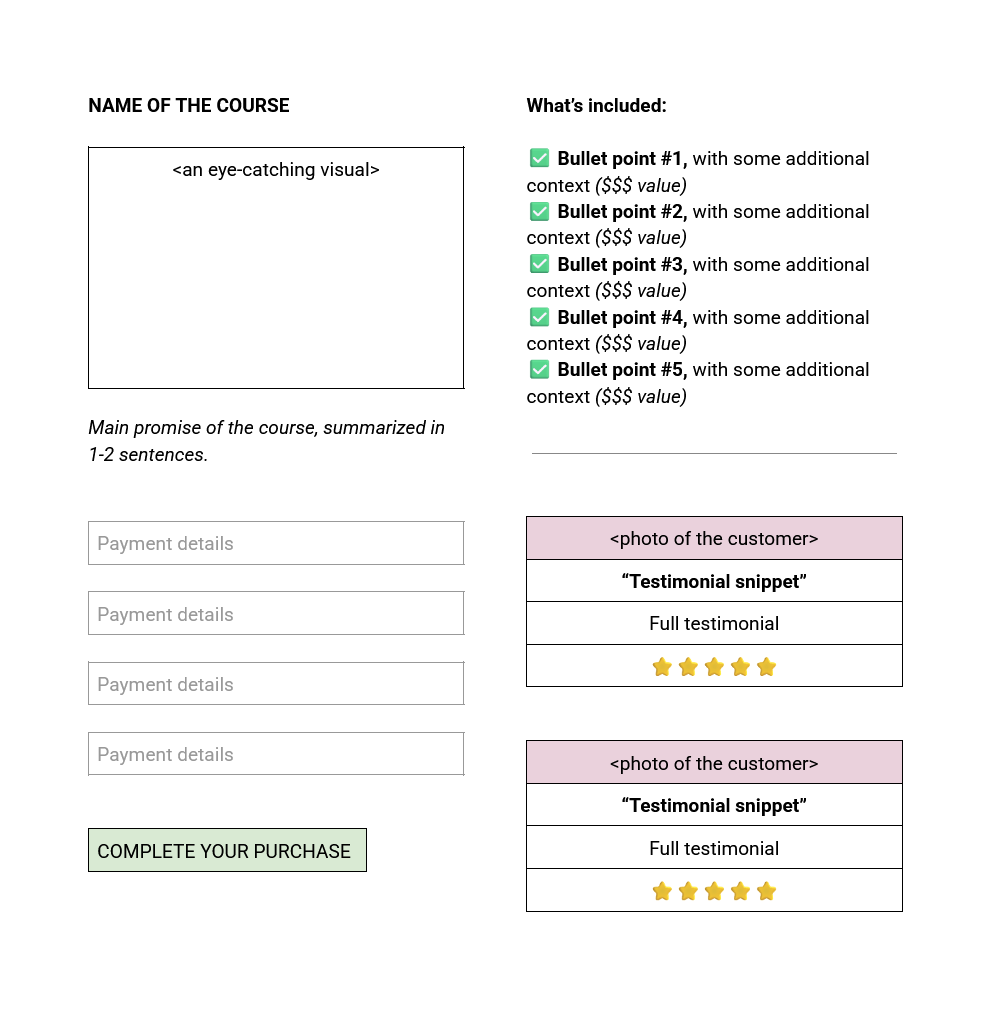
Digital Product Checkout Page Design Example
🎨 Here is an example of how I would structure a checkout page for one of my copywriting clients (using the principles outlined above):
What Tools Do I Need To Build My Checkout Page?
If you are using an all-in-one course platform like Teachable or Thinkific, you will probably have access to some sort of checkout page software within your subscription.
That said, these tools don’t always have the most flexible checkout page design/layout options…
Which could be a problem if you want to get the most out of yours.
My Favorite Checkout Page Design Tool
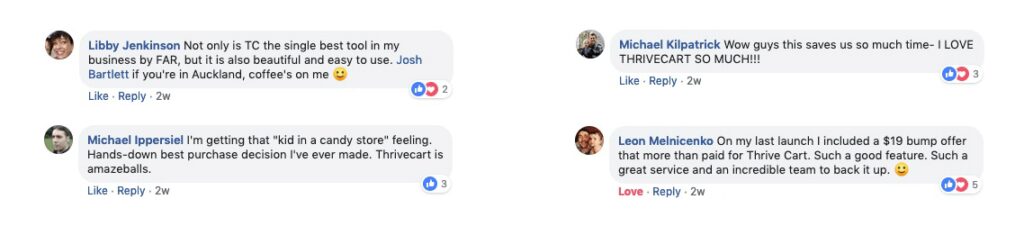
I do a little happy dance whenever a new client tells me they are using ThriveCart for their checkout pages.
It lets me know we will have the flexibility to create something truly fabulous together (and I won’t have to hold back on my copy magic because of any design limitations).
Other people seem to agree.
So if you’re in the market for some new digital product software…
Check out (ha! get it? 😄) their checkout page builder here.
Got More Qs?
You can always book a 60-minute Sounding Board Session with me to go over any remaining questions or look over your first draft together.
And hey, if you’d rather hand off the whole “writing sales funnel copy” thing to someone else entirely?
Perhaps it’s time to hire me as your conversion copywriter.


+ show Comments
- Hide Comments
add a comment